There is no doubt that starter is an electric motor to connect the battery, which will spin the engine when ignition key is turned to the start position. Starter Motor allows the engine to "start" and begin running. While, a faulty starter will result in a difficulty in starting the engine. Most people don’t know when should replace starter, check out our buying guide 7 Common Reason Why Your Car Won't Start. You can also test the lights, radio, and horn to confirm what’s happen to your starter.
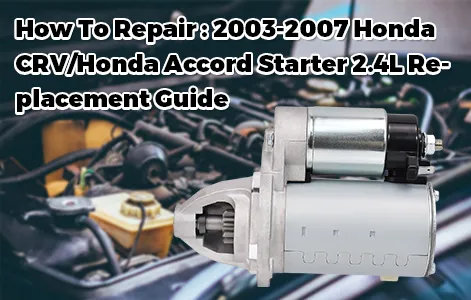
Honda CRV starter is a fundamental component to the automobile as a whole. 2003-2010 Honda CRV as one of the most popular model, we would like to share the repair guide for 2003-2007 Honda CRV Starter 2.4L Replacement. Also, this guide is also apply to Honda Accord 2.4L/ Honda Element starter replacement.
How Much Does a Honda CRV Starter Replacement Cost?
| 2006-2012 Honda Accord Starter 2.4L | 1998-2002 Honda Accord Starter 2.3L | 2007-2011 Honda CRV Starter 2.4L | 2002-2006 Honda CRV Starter 2.4L |

|

|

|

|
You have to consider the costs of the repair itself, since this job is pretty much suited for a mechanic. So, the average costs typically run about $400 to $500, depending on your area. The Honda CRV starter itself can cost anywhere from as low as $39 to as much as $100, typically based on which brand you want to buy. You can shop Honda CRV Starter on HexAutoParts.com! You can follow these steps to fix your starer:
Tools You Need Prepare:
- Replacement starter motor
- Socket set
- Wrench set
- Hydraulic jack
- Jack stands
- Protective eyewear and gloves
- Flashlight
- Screwdriver set
Note: Take a couple pictures before your start taking stuff off so that we can get it back easy.

1> First thing we should disconnect the battery negative terminal. Lift the hood and remove the negative battery cable from the battery making sure the cable end is clear of the battery to avoid an accidental connection.

2> Next remove the intake tube from the throttle body going to the air filter box, you do not need to remove the air filter box.

3> Then, we need to remove intake manifold. There are 12 mm 6 bolts and nuts that is holding the intake manifold. Two on the top and 3 on the bottom of the intake manifold. Also, one 12 mm bolts intake manifold bracket that is holding in place, remove it.

4> If you want to remove intake manifold that you need make room for it. We can remove the beam above the battery. It is not difficult, just remove 6 bolts.
5> Finally, we can find the honda crv starter location. Here are two starter bolts 1 14 mm bolt on the top and 1 17 mm bolt on the bottom we need remove.

6> Once the old starter has been removed, match the replacement unit to ensure a proper installation.
7> After cleaning the mounting surfaces thoroughly, gently install the starter motor. (Note: Starters contain magnets which are brittle and can crack hindering the starter performance if not handled carefully.)
8> After all starter bolts have been installed, use a socket or wrench to tighten evenly and insert the positive battery cable onto the starter solenoid.
9> When reconnecting the negative battery cable, quickly (lightly) touch and release the cable to battery terminal, this quick check tests for a short circuit. Though a light (little) spark is normal, a large "zap" means there is a problem with the starter installation.
10> Once the job is complete, turn the ignition key to check the starter operation, if the starter does not work or makes abnormal noises, recheck the job wiring and starter mounting bolts.